

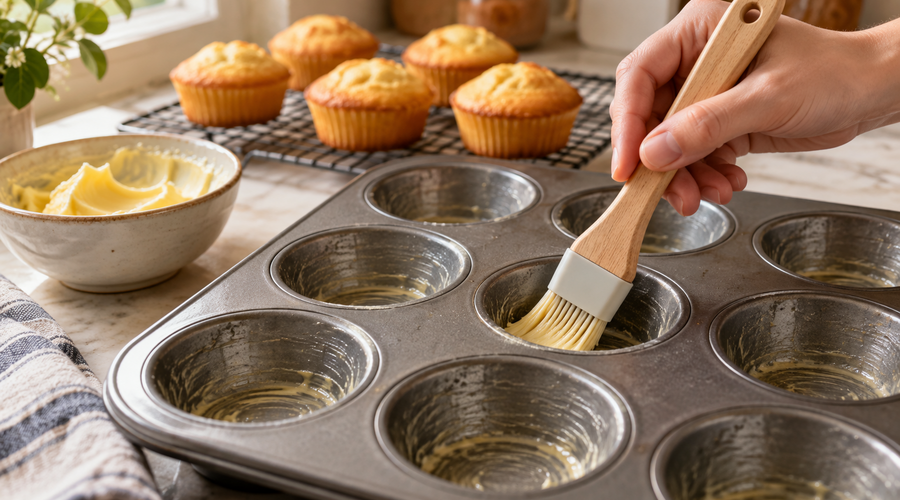
There's nothing quite like pulling a fresh batch of muffins or cupcakes out of the oven, until you turn them out and find half the batch still clinging to the pan.
A little care when greasing your muffin tin can help make that first muffin come out just as nicely as the last. Whether you reach for butter, oil, or cooking spray, the trick is to coat each cup evenly, including the sides and the little corners where the bottom meets the wall.
Here are a few simple ways to prep your pan, plus some tips for those extra-sticky recipes.
Why the Method You Choose Matters
Butter, oil, shortening, and non-stick cooking spray can all help with release. What matters most is applying your chosen grease evenly and not leaving big pools behind.
Pay special attention to the seam where the bottom of each cup meets the sides. It's easy to miss that spot when you're in a hurry, and it's one of the places baked goods can catch.
Melted Butter and a Pastry Brush
For a classic approach, melt a little butter and use a pastry brush to coat the inside of each cup. Brush across the bottom, up the sides, and into the corners.
A pastry brush makes it easier to reach all those little spots without using too much butter. If you don't have one in your kitchen drawer yet, take a look at our kitchen essentials and utensils. It's a handy tool to have around for more than just baking.
Softened Butter or Shortening
No melted butter? No problem. Take a small spoonful of softened butter or shortening and rub it into the pan using a paper towel or a piece of wax paper. This method gives you more control over how thick the layer is, and it's easy to feel with your fingers whether you've missed a spot.
Go slowly around the base of each cup where it meets the sides. That seam is the part that gets skipped most often.
Non-Stick Cooking Spray
Cooking spray is quick and convenient, especially when you're prepping a whole tray. Hold the pan over the sink and give each cup a light, even spray.
Try not to overdo it. If spray collects on the flat edges of the pan, wipe away the excess with a paper towel. Built-up residue can become difficult to clean over time, so a light coating is usually all you need.
A Little Neutral Oil
Vegetable or canola oil can work well, too. Add a small amount to each cup, then use a paper towel or pastry brush to spread it across the bottom and sides.
Avoid pouring in too much at once, since oil can gather at the bottom of the cup instead of coating the whole surface. A thin, even layer is the goal.
When a Light Dusting of Flour Can Help
If a particular recipe tends to stick, you can try a little extra insurance: after greasing the cups, add a small pinch of flour to each one.
Tilt and gently tap the pan to distribute the flour, then turn the pan over the sink and tap out the excess. This can be helpful for some recipes, but it isn't necessary for every batch. Follow the recipe's instructions if it gives a specific pan-preparation method.
What About Paper or Parchment Liners?
Liners are a handy option when you'd rather not grease the pan itself. They can also make it easier to serve and share muffins or cupcakes.
Most of the time, you don't need to grease the liners. For especially sticky batters, check the recipe or liner instructions to see whether a light spray is recommended.
Baking without liners? That's when careful, even greasing becomes especially important.
A Few Things to Avoid
More grease doesn't always mean better release. A thick layer can leave greasy edges, and excess cooking spray may leave residue on your pan.
Also, don't grease only the bottom of each cup. Muffins and cupcakes rise and spread against the sides as they bake, so make sure the whole inside surface is covered.
Still Sticking After All That?
If you're prepping the pan carefully and your muffins still won't come out cleanly, take a look at the pan itself. A worn non-stick coating, scratches, or a warped pan can make release more difficult.
We carry non-stick and stainless steel muffin pans in our Cupcake & Muffin Pans collection. Not sure which style fits your baking routine? Our guide to silicone and metal muffin pans walks through the differences. And if you're still troubleshooting, have a look at why muffins keep sticking to the pan.
Come visit us at Heart of the Home in Edmonton. We're happy to help you find the pan and tools that make baking feel a little easier. Pastry brush included.
Frequently Asked Questions
What's the best thing to grease a muffin pan with?
Butter, shortening, neutral oil, and non-stick cooking spray can all work. The important part is to apply a light, even coating to the bottom and sides of each cup. A pastry brush can make melted butter especially easy to spread.
Can I grease a muffin pan with vegetable oil?
Yes. Drizzle a small amount into each cup and spread it evenly with a paper towel, making sure to coat the sides as well as the bottom.
Do you have to grease the pan when using cupcake liners?
Usually, no. Liners are designed to make removal easier, and most recipes don't require greasing them. For sticky or high-sugar batters, follow the recipe's guidance.
Why did my muffins stick even though I greased the pan?
You may have missed a spot, particularly around the seam where the sides meet the bottom. The pan's condition and the recipe can also affect release. If the muffins are very delicate, let them rest in the pan for a few minutes before removing them.
How long should muffins cool before removing them from the pan?
Many recipes recommend letting muffins rest in the pan for about five to ten minutes. Check your recipe, since the ideal cooling time can vary. Then loosen the edges gently if needed and transfer the muffins to a cooling rack.
Leave a comment